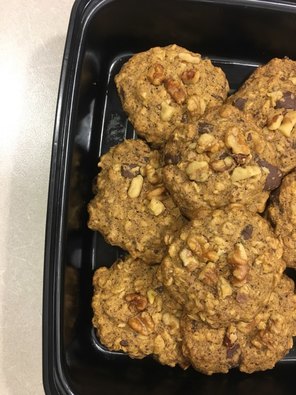
 As you can see my "Recipe Wednesday" trend has quickly fallen apart..HOWEVER who says you can't hop back on the train a day later? Nobody I tell ya' nobody! So here we are, on this lovely Recipe Wednesday - Thursday.. it's especially lovely because I am bringing you all something sweet (and who can say no to that?!). For those of you that know me well you're well aware that I LOVE to indulge in sweets. In a perfect world [to me at least] the nutritional diagram in the shape of a pyramid (aka the food pyramid) issued by the USADA (United States Department of Agriculture) sweets would be one of the main components of a healthy diet. Although I strongly disagree with the USDA's food pyramid, I would indeed be pretty excited to see desserts plastered all over that diagram. HOWEVER, that's not an ideal way to stay healthy and keep our bodies functioning properly so we must improvise and folks, that is what I have done here. My search for a really good, chewy, chocolately, healthy, vegan, gluten free cookie has come a long way. No one on the planet can deny a chocolate chip cookie let's be honest here, and if they can well...then they're obviously lying to themselves because the chocolate chip cookie is a staple in the dessert world. I LOVE a good chocolate chip cookie, although it isn't that easy to find one that's both gluten free and vegan, as well as not hard as a rock. This brought me to start experimenting on my own and I must say...these are SO GOOD. 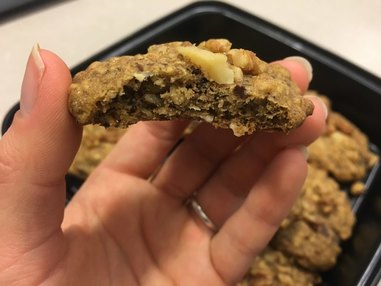 Although the outcome was fantastic, I did struggle at first to find ways to maneuver over using eggs in this recipe..thank god Google has every answer to every possible question on the planet. So for your reference and because every post needs a fun fact: one can easily replicate an egg with two simple ingredients (it doesn't get any easier than this) ground flax seed and water! To make what I call a "Flax Egg", one must simply combine 1 TBSP of ground flax seed in a bowl with 3 TBSP of water and allow it to sit for roughly 15 minutes....it literally doesn't get any easier than that. Although you might not obtain the same flavor as an egg itself, you will get the texture and consistency that you would get from an egg. HOW WILD!
So let me make this short and sweet and cut straight to the recipe because I'm extremely excited to share this with you all! Ingredients 1.) 1c Gluten Free Flour 2.) 1c Oats 3.) 1/2 tsp baking powder 4.) 1/2 tsp baking soda 5.) 1/2 tsp ground flax seed (this is only for the cookie, you'll need more for the egg) 6.) 1/4 tsp salt 7.) 1tbsp cinnamon 8.) 1c vegan chocolate (at least 70% cacao, no dairy added) 9.) 1/4c + 2tbsp melted coconut oil 10.) 1/4c pure maple syrup 11.) 1/4c coconut sugar 12.) 1 tsp pure vanilla extract 13.) 2 flax eggs (2 tbsp ground flax + 6 tbsp water soak for 15 min before use) Instructions 1.) Preheat ya' oven to 350 degrees Fahrenheit 2.) Line your baking sheet with parchment paper (or I used rubber baking mats) 3.) Mix your flax seed with water and set aside for 15 mins 4.) In a separate bow mix together all of your dry ingredients, set that puppy aside 5.) In ANOTHER bowl mix together all your wet ingredients (that includes sugar) 6.) After the 15 mins, add your flax eggs to your wet ingredients 7.) Mix the wet ingredients into your dry ingredients 8.) Scoop your "dough" into balls (as best as you can) and when you place them on your baking sheet, sculpt them into circles as best as possible and press them down because they aren't going to flatten much at all 9.) Bake for about 8-12 minutes and WA-LA! You're done! I hope you enjoy these guys as much as I did...considering I ate almost the entire container on my own...Enjoy the treats and don't forget that you too can indulge in sweets! Until next time... Stay Green, Amanda
0 Comments
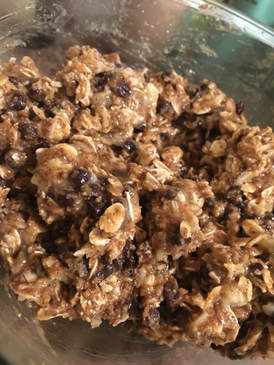
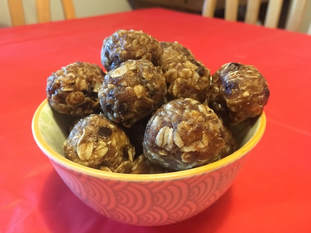
 Hiya everyone! Something new I have decided to establish is recipe Wednesday, so every Wednesday I will post a new recipe to keep all you guys fueled and so...I actually cook once in a while. SO this week I am starting with a new discovery of mine (new to me....not the rest of the world..) ENERGY BITES! I have seen these things ALL OVER Instagram and well I thought it was my turn to take a crack at them and let me just say I am now 100% addicted. These things are so simple to make and so easy for a nice grab and go pre and post workouts. The ingredients are all natural, easy to find, and overall good for your health! I also chose to use mostly locally grown ingredients because I am a fan of supporting and helping local farmers / small business owners here in the Capital Region. I know where the ingredients is coming from and I can always trust that it's 100% fresh and free of GMO's (Genetically Modified Organisms).
Any who - let's get started with what's in these little guys! Ingredients 1.) 1c Organic rolled oats (dry - or toasted!) 2.) 1/2 c Ground flax seeds 3.) 1/3 c Coconut flakes (can also be toasted!) 4.) 1/4 c Vegan chocolate chips (...yes they do exist!) 5.) 1/3 c Local / organic honey (or you can use agave!) 6.) 1 TBSP ground cinnamon 7.) 1/2 c Local / organic Peanut Butter (can also use other nut butters) 8.) 1 TBSP All natural vanilla extract Instructions: 1.) Put all ingredients into a bowl (I suggest putting in dry then wet) 2.) Stir the mixture together 3.) Store mixture in the fridge for about a half hour 4.) Remove from the fridge, roll into balls (I use a spoon to try to make them all the same size) 5.) Place balls on a baking sheet covered in parchment paper 6.) Refrigerate for about and hour and enjoy! SO EASY to make and easy to store. I recommend keeping them in the fridge when you aren't eating them and definitely try to mix up the ingredients (that's my plan next time). Like I said these guys are a GREAT grab and go snack, i've been consuming them before runs and they've actually worked out really well. I'm working on experimenting with different super foods to find that perfect pre-workout / pre-race snack. So keep experimenting and let me know what you guys come up with! Until next time... Stay Green, Amanda 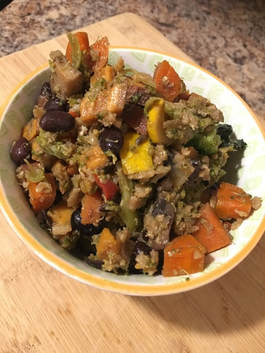 If there was one meal I can easily always be in the mood for it would definitely be stirfry. Not only for it's Asian flavor, but for it's versatility! During these 23 years of my life i've easily eaten dozens of different stirfry combinations, and they just keep getting better. This recipe kind of came up out of nowhere, the first time I made it I realized how big of a batch I had created and how quickly it could turn into a great meal prep option! So as you can imagine this instantly became my meal prep go-to.
I was able to combine almost all of my favorite veggies into this pan of greatness...as weird as that may sound. You will find that in the recipe I do include egg-whites. The thought of eggs being a part of a plant-based diet has been stirring up controversy in the vegan/vegetarian/plant-based world for years. For me -- I find that occasional egg whites are okay, I will note that I do not consume the yolk of the egg because I find the nutrients I need are in the egg whites, plus they work as a great binder for the stirfry to give that "fried rice feel". Whether you choose to use eggs or not or maybe produce a vegan substitute is up to you, but for me I enjoy a little egg white action and with that being said let's continue on to the recipe! Super Savory Stirfry Ingredients (recipe makes roughly 5 meals @ 1& 1/2 c per container) 1.) 3-4 baby sweet potaotes 2.) 1 can of black beans (rinsed) 3.) 1 yellow "summer" squash 4.) 1 c brown rice (pre cooked) 5.) 2 carrots (chopped) 6.) 1 bag steamed broccoli (approx. 2 cups) 7.) 1 1/2 tsp ginger 8.) Soy sauce (amount is to your liking I normally use about 1/4 c or so) 9.) 1 container/box baby bella mushrooms chopped 10.) 1/2 yellow onion 11.) 1 orange pepper (chopped) 12.) 3 Egg whites (optional) 13.) Salt & Pep 14.) pinch of smoked paprika (Trader Joes) 15.) Oil (I use Trader Joes Avocado Oil) Instructions 1.) Prepare your brown rice (I do mine on a stove top) 2.) In a large skillet saute the onion and orange pepper until soft and the onion is transparent 3.) Chop all veggies 4.) Once onion and pepper are done dump in all your veggies into the skillet 5.) Saute with your Soy Sauce 6.) Once your rice is done, add the entire thing (if it fits) into the skillet and stir 7.) Here I like to add more Soy Sauce because the rice absorbs a lot of it 8.) Whisk your eggwhites 9.) Add in your egg whites to your skillet and mix until the whites are cooked 10.) Add in your ginger, salt, pepper, paprika, and mix until fully combined 11.) That's it!! Quick, easy, and can be made in bulk for the week! Can you go wrong with that? I think not! Test it out and tag me in your pics of your stirfry combinations! --> @amandaperri Until next time... Stay Green, Amanda 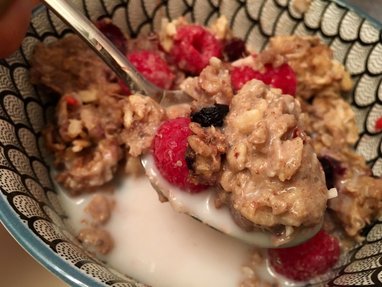 Oatmeal: the world's superhero of breakfast foods... at least that's how I categorize this bowl of deliciousness. Now normally I start my mornings with a 22-24 ounce smoothie however i've been working with a macro coach (a trainer that provides me with proper macronutrient numbers everyday to help me accomplish my body goals) and she suggested that I give oatmeal a try..she's a genius let me just tell you all that...
In the past I used to waltz into the grocery store and pick up the packaged Quaker oats brand of instant oatmeal that came in those cute little brown packages, but now that i've started making my own oatmeal with fresh rolled oats i'll never go back...unless i'm extremely lazy. SO I thought i'd share with you guys four of my favorite fun facts about our breakfast friend Oatmeal: 1. Oats have the highest portion of soluble fiber (soluble fiber intestinal tract trap substances associated with blood Cholesterol) 2. It's great for your skin! Hence the oatmeal mask fad... The starchiness of oats creates a barrier that allows the skin to hold its moisture, while the rougher fibrous husk of the oat acts as a gentle exfoliant 3. Oatmeal stabilizes your blood sugar and keeps ya' energized! This is great for those of us who have the awful mid-day "crash". As a result of oatmeal's high soluble fiber content, its sugar is released more slowly into the blood stream (aka, it has a low glycemic index) 4. It helps your athletic performance! Oatmeal, is a great carbohydrate and protein source, providing calories and energy for energy needs. Oats have been shown in scientific studies to favorably alter metabolism and enhance performance when ingested 45 minutes to 1 hour before exercise of moderate intensity What's not to love about Oatmeal?! Plus did I forget to mention how delicious and versatile it is?? I think I might have.. well it's absolutely DELICIOUS and VERSATILE! Also... it can be made ahead of time so it's less time consuming. I spend my Sunday/Monday nights prepping these babies and i'm set for the week all I have to do is pop them in the microwave, but here is your warning PLEASE keep an eye on your jar as it's in the microwave because oats explode...really quickly.... Oh My Overnight Oatmeal Ingredients per 1 jar: 1.) 1/2 cup Organic rolled oats 2.) 1/2 ripe banana - mashed 3.) 1/2 tbsp organic coconut flakes 4.) 1 tbsp dried cranberries 5.) 1 tbsp dried blueberries 6.) 1tsp cinnamon 7.) 1 tbsp organic creamy peanut butter 8.) 2/3 cup almond milk 9.) 1 tbsp chia seeds 10.) handful of fresh raspberries Instructions Prep at the beginning of the week: 1.) In a medium sized bowl mash your 1/2 of your banana 2.) add your oats, dried fruit, coconut, chia seeds, peanut butter, cinnamon 3.) mix 4.) scoop mixture into 16oz mason jar or whatever kind of jar you can find with a sealable lid 5.) pour in almond milk 6.) stir and shake ( with the lid on please! ) 7.) store in fridge! 8.) when ready to eat simply place the jar without the lid in the microwave for a minute and a half (BE SURE TO WATCH IT) transfer mixture to a bowl, top with raspberries and enjoy! Easy-peasy breakfast for the week! Now you can give yourself some extra time to sleep in the morning tack on a few more minutes to your morning run! Try your own kind of combinations and add them to the comments of this post! I'd love to see what you guys come up with. Until next time... Stay Green, Amanda 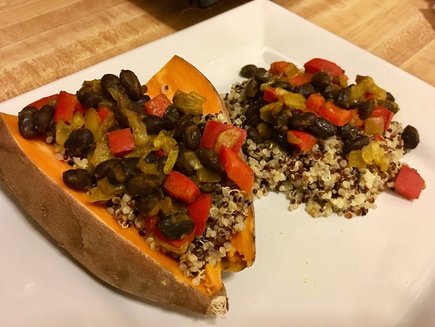 I've wanted to attempt a stuffed sweet potato for the LONGEST time. I generally get sent recipes from friends when they discover something organic and plant-based (they know me so well). A month or two ago, a friend sent me a pinterest link and labeled it: "YOU NEED TO MAKE THIS". It was a vegetarian stuffed sweet potato and man did it look delicious. It was stuffed with quinoa, sautéed spinach, chickpeas, and topped with some type of sauce. I was completely inspired and decided it was finally time for me to whip up some type of concoction. Luckily, Sunday's are my easy days. I enjoyed a lovely 8 mile run with a couple of girlfriends followed by a nice light lunch at a local cafe and after that my day was completely free. Having all this free time I decided it was the perfect day to bake some sweet potatoes! For those of you who do not know me -- I am addicted to sweet potatoes and they are by far my favorite vegetable mostly for taste but also for their versatility! In my previous recipes you'll find that i've used my sweet potatoes in various different ways (even as noodles), so any time I get a opportunity to transform the infamous sweet potato I give it a shot! Now out of all the possible ways to cook a sweet potato I would honestly say baking them is my all-time favorite. I prefer them over white potatoes and let me explain why.... Sweet potatoes VS White potatoes Fiber: Sweet Potatoes 4g | White Potatoes 3g Protein: Sweet Potatoes 2g | White Potatoes 3g Calories: Sweet Potatoes 90 | White Potatoes 130 Carbs: Sweet Potatoes 24g | White Potatoes 29g Vitamin A: Sweet Potatoes 22,000 IU | White Potatoes 14 IU Vitamin C: Sweet Potatoes 22 mg | White Potatoes 17.4 mg Vitamin B6: Sweet Potatoes 0.3 mg | White Potatoes 0.3mg So what the heck does all this data mean for the Sweet Potato? Well for one we've got more fiber in your Sweet rather than your White (I love me some good fiber). Secondly, the Sweets are providing us with 400% of our daily requirement of Vitamin A (hello good eye sight!). Lastly, they offer more Vitamin C, contain less carbohydrates, and come packed with fewer calories than our White Potato. Although the White Potato is generally cheaper at supermarkets you get a little more bang for your buck with the Sweet Potato!  I'm pretty sure I eat sweet potatoes just about every night so switching up the way my potatoes are prepared keeps me from getting bored (although I doubt that's possible for me). These Potatoes boats as I call them were the perfect Sunday meal to end our weekend. The best part about these "boats" were that you could literally stuff them with anything! Although I know I did not cook my potatoes long enough, they were still delicious and received positive feedback so I will definitely be trying them again! So let's get to the recipe here and i'll stop rambling..... Super-Stuffed Baked Sweet Potatoes
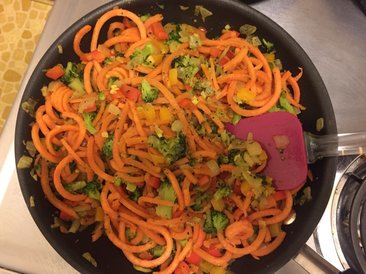
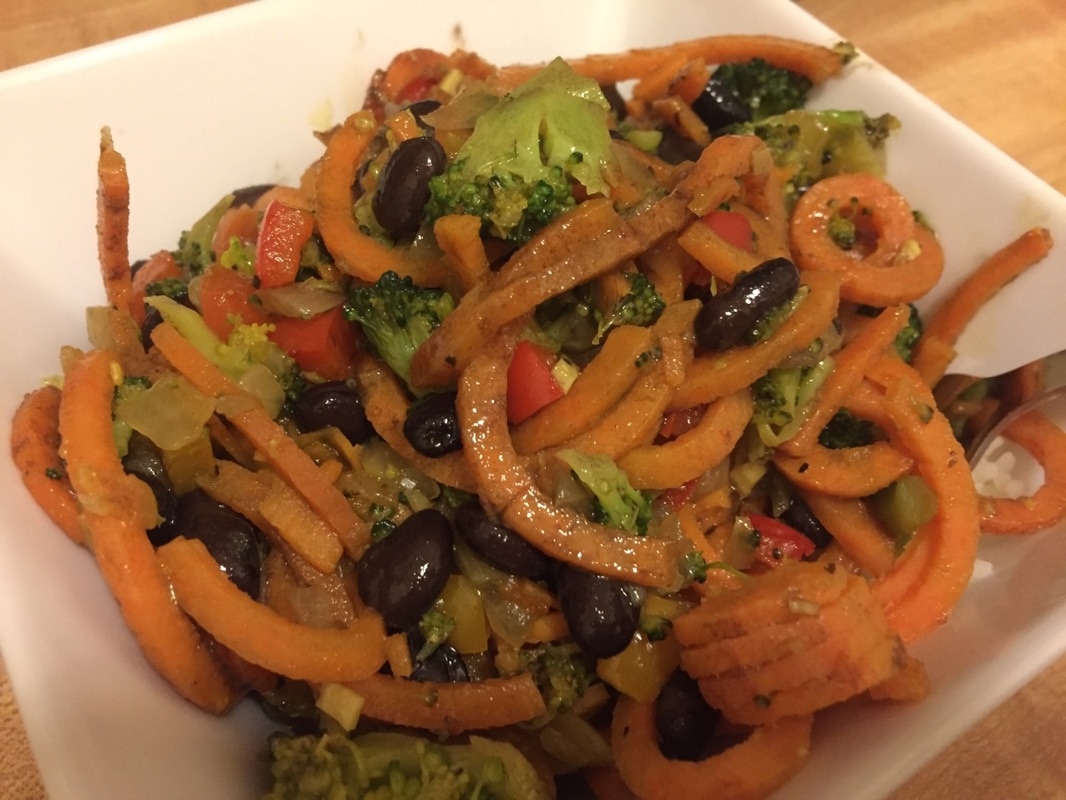
1.) 2-3 medium sweet potatoes (depending on # of consumers) 2.) 1 can drained black beans 3.) 1 cup cooked tri colored quinoa 4.) 1 red bell pepper diced 5.) 1/2 yellow onion diced 6.) 1 tsp turmeric 7.) 1 tsp chilli spice 8.) 1 tsp cumin 9.) 1 tsp garlic powder/salt 10.) pepper to taste 11.) 1 tsp olive oil Instructions 1.) Pre-heat oven to 350 degrees 2.) Lay out sweet potatoes on a greased baking sheet 3.) Put quinoa in rice cooker 4.) Once oven is pre-heated place sweet potatoes in oven and set for roughly 65 minutes but once the 65 minutes is up check them because I didn't and mine definitely could have cooked longer, so shoot for 65 to 75 minutes 5.) With 10 minutes left to go on your sweet potatoes start to prep the filling for your potatoes 6.) Place peppers and onions in a skillet on medium-high heat with olive oil and spices and cook until onion is transparent 7.) Add in your rinsed black beans and cook for a total of about 6 minutes 8.) Once the sweet potatoes are done remove them from the oven 9.) Take a knife and cut down the middle of them but don't cut all the way to the bottom 10.) Using a fork slightly mash the inside of where you made your cut on your sweet potato, it should easily remove itself from the skin 11.) Once some of the potato is mashed, start to fill your potato I started with quinoa then added my black bean, pepper, and onion mixture 12.) TA-DA! You're done! Now stuff your face with that sweet potato Easy-peasy...right? Not too bad and perfect for a day where you've got time to prepare your meal. Like I said before, I definitely didn't cook mine long enough because they were still slightly tough, but I shall continue to experiment and I bet it would have tasted amazing with some guac or type of spicy sauce on top... NOM! Test it out! Attempt your own kind of mix ups (I know I will). Feel free to share your stuffed sweet potato concoctions with me i'd love to see all your ideas! Until next time.... Stay Green, Amanda 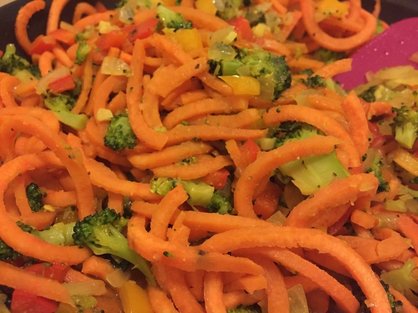 Move over traditional pasta, there's a new noodle in town! ( I really should probably stop trying to be funny...) Yep you heard me right; sweet potato noodles are in the house! Sounds crazy...and kind of weird but tastes AMAZING. I'll be real with you guys I was hesitant at first to give it a shot but I couldn't be more pleased that I did! So similar to the zucchini noodle craze, it seems to be that sweet potato noodles as well as butternut squash noodles and beet noodles have made their way to the grocery store shelves. For all of us gluten haters...or well people who are forced to hate gluten this is fantastic! My favorite veggie has been morphed into one of my favorite dishes -- pasta! Coming from an italian family and those who are aware of the italian heritage know that pasta is a BIG DEAL. It's served roughly 7x a week (no joke) and if it's not a main dish it's certainly a side dish on the dinner table during your casual 5 course meal. As an amateur culinary extraordinaire, I was excited to expand my horizons and take a shot at putting together something [hopefully] great. Although I am a big fan of a plate of pasta covered in a delicious sweet red sauce, I was more in a mood for a little stirfry so I decided to give it a chance. The result : amazing (obviously...kidding). I was so pleased that all the flavors I mashed together, because I literally guess at everything, flowed perfectly and made for a fantastic dish! The sweet potato was cooked perfectly without being too tough, and it actually cooked much better than my zucchini noodles have cooked in the past. Generally with zucchini noodles I cook them in a little bit of water to avoid completely over-sautéing them but I found with the sweet potato that I didn't have to do that at all which was great!
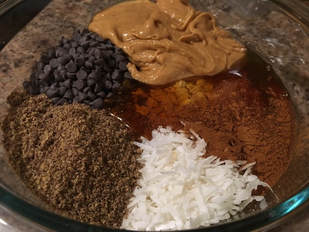
Another great thing I found was that the noodles are so extremely versatile. After tasting them I was able to think of thousands of flavor combinations that I could possibly come up with in the future. ALSO I found that it's so much faster to cook my sweet potatoes this way compared to them being cubed and then sautéed...that can tend to take a while unless you jack the heat up to high... anyways enough rambling, let's get to the recipe! Saweeeet Sweet Potato Noodle Stirfry 1.) 1 package of sweet potato noodles (got mine at Hannaford's or you can spiralize your own) 2.) 2 cups of broccoli florets (raw) 3.) 1 orange bell pepper cubed 4.) 1 red bell pepper cubed 5.) 1 medium sweet onion cubed 6.) 1 can black beans 7.) 2 TBSP olive oil 8.) 2 TBSP Gluten free soy sauce 9.) 1 TBSP organic honey 10.) Salt and pepper to taste 12.) 2 cups brown rice (optional) Instructions 1.)First off if you're going to put the stirfry over brown rice I HIGHLY suggest you start cooking your brown rice in your rice cooker well before you start doing anything else (it takes a while) 2.) Chop up/cube your peppers and onions 3.) Place peppers and onions in a skillet with olive oil and sauté on medium-hot heat but do not burn 4.) Chop up your broccoli and add it to the pan once the onions and peppers start to become soft and flimsy 5.) After about 5 minutes or so add in your sweet potato noodles (raw) and cook everything together on medium heat after about a minute add in the soy sauce and honey -- continue to stir 6.) Add salt and pepper 7.) Mix, and after about 7 minutes add in your black beans, putting the heat of your stove down to low 8.) Remove pan from heat and place your stirfry over your brown rice and enjoy!! Quick and easy especially if your rice is cooked before hand, you're done in about 10-15 minutes depending on how fast you can chop your veggies (if your Gordon Ramsey I estimate that it takes you about 2 seconds). Next time I will definitely experiment with a few different spices and sauces... I can guarantee a peanut sauce would taste AMAZING on these noodles (now I am starving...). Well these noodles have definitely made their way up on my favorites list and I am so excited to test out some different variations of noodles, give them a chance! Until next time.... Stay Green, Amanda 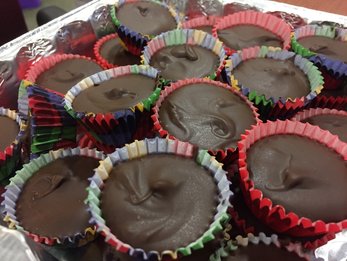 I love when birthday's come around in the office...or well someone's birthday in general in which whom I am close with. Why? Because it's a PERFECT excuse to make/create something a little sweet but yet extremely healthy (for the most part...). Lucky for me it was my best friend's birthday! I work with her in my office, so it was the perfect opportunity to whip up a big batch of something sweet for everyone to enjoy without the worry of a high calorie count or being filled with preservatives. Here folks I introduce to you my all organic, healthy, better than Reese's PB cups! I know in my "sugar break" I said I would obviously push away from sugar but that doesn't mean other's can't enjoy them right? Plus with the organic PB I had it was sugar free so WIN! Reese's Peanut Butter cups/products are one of the most popular "candy bars" on the market next to the classic Hersey's bar. Reese's have been an all time favorite of mine since the day I was born...literally. Well that is until I started to pay attention to my diet and the nutritional benefits of my food.
I think it's pretty obvious as to why a majority of the planet and I have always been a peanut butter cup lovers...because it is a GENIUS idea to combine chocolate and peanut butter. It's literally the best invention/combination you could ask for , that's all I can say -- true genius. As good as peanut butter cups are, unfortunately most come with consequences such as an outrageous amount of calories, sugar, and chemicals (preservatives). However don't fret, because there is a solution to all of this -- a sweet solution to say the least (I know i'm not clever or a comedian...). With a few substitutions you can easily have yourself a concoction that makes you regret all the dollars spent on Reese's...or not...that could easily be true as well but let's pretend it does make you regret the money spent. Let's cut to the chase because I know you're all DYING to know the secret..honestly probably not because Google exists so you could find this yourself but i'm going to give ya' my recipe anyways! Better Than Reese's PB Cups BASE 1.) 1 cup Peanut butter (organic) 2.) 1/2 cup coconut flour 3.) 1/4 cup organic/pure maple syrup 4.) 1/8 - 1/4 cup agave (don't let the dough become too liquid-y) TOPPING 1.) 1/2 to 1 cup Peanut Butter (organic) 2.) 1 cup vegan chocolate chips (found mine at Whole Foods) Instructions 1.) Line a mini muffin pan (or multiple pants) with mini liners 2.) Combine flour, agave, maple syrup, and PB in a medium sized bowl 3.) Mix with a spatula until dough is formed 4.) I used a 1tsp scoop to scoop out dough evenly 5.) Place dough balls in cups and push down with thumb 6.) In a double boiler melt PB and Chocolate over a stove top 7.) Use that 1tsp scoop again to evenly scoop chocolate into cups over the dough 8.) Once completed with the entire tray place in a freezer for about 90 minutes 9.) TA-DA! Enjoy Easy peasy right? They come out SO GOOD I swear...I did try one... multiple one's. They were a huge hit in the office and didn't break my bank account either compared to buying ingredients to bake a cake or cupcakes. Easy to handle, consume, and enjoy I HIGHLY recommend trying this recipe out! Until next time.... Stay Green, Amanda 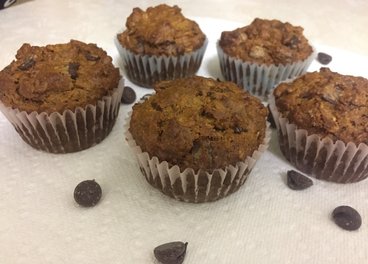 I promise folks i'll get my Nikon up and running soon so I can actually publish good looking photographs of my food..For now we can just all agree that photo quality does not reflect the quality of the food. I am so proud of myself for these muffins, they came out so good! I cannot take full credit for the recipe because it did somewhat stem from my favorite book "Run Fast, Eat Slow" by my all-time favorite marathon runner Shalane Flanagan and Elyse Kopecky. Ever since I purchased the book I have been in LOVE. It's a perfect mix of nutrition information for runners as well as fantastic recipes. If you haven't checked it out yet YOU MUST. It will change your life!
Any who, in the book there is a recipe for what Shalane and Elyse call "Superhero muffins" (delish by the way!). A truly power-packed, superfood muffin that's absolutely mouth watering, and packed with enough nutrients for a great pre or post long run snack. I love the recipe mostly because it's gluten free and I can snack on a muffin and be satisfied for quite some time. Now in the book, the recipes are not all plant-based. Their muffin recipes do include eggs as well as butter because Shalane and Elyse refuse to restrict their diets and believe in the benefits from organic eggs and butter. For me I used a half and half substitution just because I was nervous with how they were going to turn out at first. So since I was pretty much buried in my home today due to this awful snowstorm we have been receiving all day long (good old New York...), I decided it was a perfect day to put my baking skills to use. The only parts I really kept from the superhero muffins was the base because well like I said it's gluten free and it has been working really well for me since I began my muffin obsession. Nutritious, delicious, and power packed, these muffins will keep you full on your Sunday long run! Recipe for Chocolate PB Power Muffins 1.) 2 cups almond meal 2.) 1 cup rolled oats 3.) 1tsp baking powder 4.) 1tbsp cinnamon 5.) 1/2 tsp nutmeg 6.) 1 cup vegan chocolate chips 7.) 1/2 - 1cup organic peanut butter 8.) 1/2 cup walnuts 9.) 6 tbsp butter (or olive oil/ coconut oil) 10.) 3 organic eggs (or 3 mashed bananas) 11.) 1tsp organic vanilla extract Instructions 1.) Heat oven to 350 degrees Fahrenheit 2.) Line your muffin/ cupcake tray with liners 3.) In a medium sized bowl mix all dry ingredients (almond meal, oats, baking powder, cinnamon, nutmeg, chocolate chips, walnuts) 4.) In a separate bowl mix all wet ingredients ( melted butter or oil, eggs or bananas, vanilla, Peanut butter) 5.) Add the wet ingredients to the dry ingredients 6.) Mix! 7.) Distribute mixture to all of your liners 8.) Bake for roughly 30-32 minutes 9.) Let cool for 5 minutes, then enjoy! Quick, easy, and delicious! I get all of my organic ingredients from Trader Joes, and I go for raw walnuts as well as un-roasted, creamy, un-salted, organic peanut butter. If you feel you might need more sweetness I recommend adding about 1/4 cup chopped dates they give a great flavor and sweetness to the muffins. Give them a try and then try your own combination! Until next time.... Stay Green, Amanda 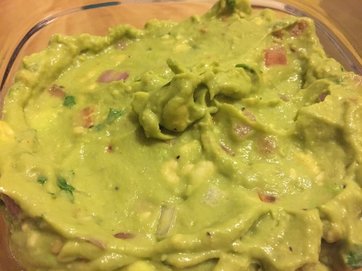 It's Super Bowl Sunday! (Well yesterday was) Which means there was a perfect excuse/opportunity to make guacamole and have all of the ingredients being on sale at Trader Joe's. It's estimated that approximately 12 millions pounds of avocados are transformed into hundreds of bowls of this perfect game day snack. I will forever be thanking the Aztec's for one of the best inventions in the food industry ever (in my personal opinion). According to www.mnn.com, the original name of the concoction was known as "ahuaca-mulli" which translates to "avocado-mixture". The original recipe consisted of avocados, chili peppers, tomatoes, white onion, and salt. Nowadays guac-enthusiasts have become quite creative with their recipes, mixing in various types of spices and herbs such as cilantro.
Growing up I had such a fear of avocados (who woulda' known?). I think it mostly had to do with their color and texture that just had me feeling some type of way.... However i've come a long way since my childhood, because now I have developed an obsession with the fruit (yep, it's a fruit!). I put it on salads, toast, grains, vegetables, i've mixed it in salad dressings, pasta sauce, baked goods; you name it and i've probably at least tried it. It's not just the taste that has me addicted, but it's the benefits that avocados can bring to our bodies that has me craving for more. Avocados come packed with vitamins such as: Vitamins K, C, B5, B6, E, Potassium, Folate and slight amounts of Magnesium, Copper, Iron, Zinc, Phosphorous, Thiamine (vitamin A), Riboflavin (vitamin B), Manganese, and Niacin (vitamin B3). I'm sure to some of you that more than half of that list means nothing to you, so i'll explain all of those in another post. These guys also provide about 2 grams of protein, 9 grams of carbs with 7g of those carbs being fiber, and the biggest benefit: 15 grams of good fats. So many people (especially females) shy away from fat in their diet when they shouldn't at all! Having a balance of good, healthy fats in your body can actually aid in weight loss, provide energy, and allow your body to recover and repair damaged tissue after intense exercise. The oleic acid from avocados can also help the body fight inflammation which is key for athletes. I've been experimenting with my guacamole recipe for a while, and i've tested almost every batch at all of the mexican restaurants that i've visited in my time. I still don't think i've nailed it completely, but I think I am pretty darn close. I've been utilizing my spices in the last couple batches i've whipped up by adding turmeric as another inflammation aid. My last two times that i've thrown some guac together have definitely been my best ones yet. Recipe for Game Day Guac 1.) 4 small ripe avocados (if making a big batch i'll use large ones) 2.) 2 cloves of garlic minced 3.) 3 Roma tomatoes cubed 4.) 1 red onion chopped (sometimes I use yellow) 5.) 1- 11/2 TBSP cilantro chopped 6.) 1 TBSP cumin 7.) 1 TSP turmeric 8.) salt and pepper to taste 9.) 1 TSP smoked paprika Instructions 1.) Chop all vegetabes 2.) De-skin (is that a real term?) the avocados and mash them 3.) Combine all vegetables with your mashed avocado in a big bowl 4.) Add your spices and then season with salt and pepper 5.) Mix! Wa-la! All complete, my best advice is to test out different combinations of spices and even try different types of salt (I prefer pink himalayan). Pair your guac with your favorite chip and you've got yourself a party! Until next time... Stay Green, Amanda 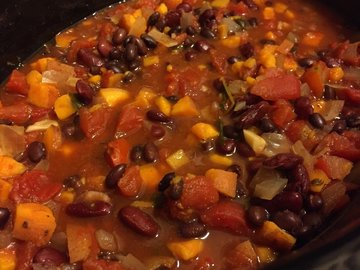 First attempt ever at making chili was a success if I do say so myself! My mother used to make chili when I was a child, and I can remember feeling nauseous as the smell would fill up the entire house (sorry mom...). Simply put, I was NOT a chili fan, mostly because at the time I wasn't a fan of beans either (go figure). Since that young age I had no ambition to ever create any version of a chili dish until recently when I was proposed with the idea of making some chili. Of course however, it had to be vegetarian or there was no way in hell (excuse my french) that this was going to happen. I certainly surprised myself with this one because this chili came out so good! Or maybe it was because it was my first time making it...regardless it was delicious and I will certainly be making more in the future.
However there was one downfall to this chili, it was a little more "soupy" than expected so in the recipe below I have negated the water portion of the list. This is so you all don't run into the same issue I did, where I was literally scooping all of the excess water out of the crockpot at the end of the heating/cooking process. Now I have to give credit to not only my mother for the recipe she provided me, but also www.realsimple.com for the additional recipe (I mixed the two and added some personal touches). So if you're down for some good old warm vegetarian chili during these cold winter months check this out! Recipe for Vegetarian Double Bean Chili 1.) 2 cans of low sodium organic black beans rinsed 2.) 1 can of low sodium organic kidney beans rinsed 3.) 1 - 15 oz. container of organic diced tomatoes (water included) 4.) 3 small/ medium sized sweet potatoes 5.) 1 large yellow onion 6.) 4 garlic cloves, chopped 7.) 1 TBSP chili powder 8.) 1 TBSP ground cumin 9.) 2 TBSP smoked paprika (found at Trader Joe's) 10.) salt and pepper to taste Instructions 1.) Place all ingredients in a crockpot, making sure the onions and sweet potatoes cover the bottom before anything else 2.) Turn your crockpot on to high heat 3.) Allow for the crockpot to do it's thing for roughly 4-5 hours 4.) Make sure to stir everything once every hour or so 5.) After everything is soft, turn off your crockpot and serve! BAM! The easiest chili you've ever made, I had poured mine over white rice but i'm sure it's just as good without it so experiment a little. Until next time.... Stay Green, Amanda |
RecipesHere are my Check out my past recipes
January 2018
|
 RSS Feed
